MaxMind GeoIP has been deprecated for some time now. For your latest Geolocation needs, use MaxMind GeoIP2 (or GeoLite2, which is the free version) instead.
In this tutorial, I will show you how to create a working Nginx and MaxMind GeoIP2/GeoLite2 setup. You’ll find the steps and commands that I have used successfully, as well as caveats, debug tips, and a small section at the end that shows how to use GeoIP2 to limit access to certain URLs by country.
Nginx MaxMind GeoIP2/GeoLite2 Setup Quick Overview
A quick look at the work ahead:-
- Install MaxMind GeoIP2 in Ubuntu
- Compile Nginx with GeoIP2 module
- Nginx-GeoIP2 Application Example (Whitelisting Country)
The Environment I’m Using
- Ubuntu 20.04 (Focal)
- Nginx 1.18.0
- DigitalOcean
1. Set Up MaxMind GeoIP2 (GeoLite2)
1a. Install MaxMind GeoIP2 packages
In this step we’ll be installing the MaxMind GeoIP2 binary (mmdb-bin), libraries (libmaxminddb0 libmaxminddb-dev), and the configuration tool/updater (geoipupdate).
First, add the official MaxMind PPA to the APT source list.
$ sudo add-apt-repository ppa:maxmind/ppaThen, install the packages.
$ sudo apt update
$ sudo apt install libmaxminddb0 libmaxminddb-dev mmdb-bin geoipupdate
Again, these packages are:-
- libmaxminddb0 libmaxminddb-dev – MaxMind Geolocation database libraries
- mmdb-bin – binary. Program to call from the command line. Use this command to geolocate IP manually.
- geoipupdate – package that assists in configuring and updating GeoIP2 / GeoLite2.
1b. Sign Up for a Free MaxMind account
For this step, you are required to have a MaxMind account ID and license key. You can sign up for GeoLite2 access for free right here.
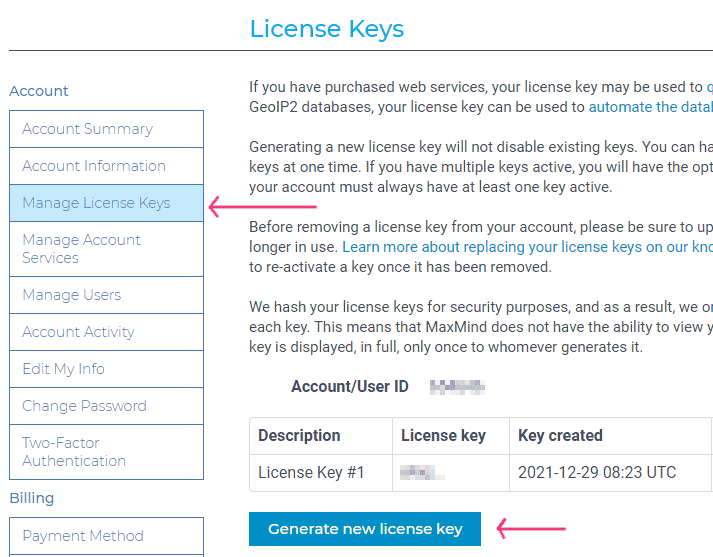
Once you have the account, go ahead and log in and go to Manage License Keys > click Generate new license key.
Keep the window open or copy the license key to a temporary location. We’ll be using that in the next step.
1c. Set up conf file and cron job
Open up the MaxMind GeoIP conf file at /etc/GeoIP.conf with your favorite text editor.
Fill up the AccountID and LicenseKey fields with information from Step 1b above. Save.
Next, set up a cron job to keep the database up-to-date.
There are many different ways to do this but this is how I did it.
$ cd /etc/cron.d
$ sudo touch geoipupdate
Create a new cron config file geoipupdate under /etc/cron.d
In the newly created file geoipupdate, add the following line to call geoipupdate every day at midnight.
0 0 * * * /usr/bin/geoipupdateTips
- Run which geoipupdate to confirm its path before using it in the cron job.
1d. Check if everything is working so far…
Run a quick IP lookup using mmdblookup. This tool comes from the mmdb-bin package we installed in Step 1a.
$ sudo mmdblookup --file /usr/share/GeoIP/GeoLite2-Country.mmdb --ip 8.8.8.8Sample output
  {
    "continent":
      {
        "code":
          "NA" <utf8_string>
        "geoname_id":
          6255149 <uint32>
        "names":
          {
            "de":
              "Nordamerika" <utf8_string>
            "en":
              "North America" <utf8_string>
            "es":
              "Norteamérica" <utf8_string>
            "fr":
              "Amérique du Nord" <utf8_string>
            "ja":
              "北アメリカ" <utf8_string>
            "pt-BR":
              "América do Norte" <utf8_string>
            "ru":
              "Северная Америка" <utf8_string>
            "zh-CN":
              "北美洲" <utf8_string>
          }
      }
    "country":
      {
        "geoname_id":
          6252001 <uint32>
        "iso_code":
          "US" <utf8_string>
        "names":
          {
            "de":
              "USA" <utf8_string>
            "en":
              "United States" <utf8_string>
            "es":
              "Estados Unidos" <utf8_string>
            "fr":
              "États Unis" <utf8_string>
            "ja":
              "アメリカ" <utf8_string>
            "pt-BR":
              "EUA" <utf8_string>
            "ru":
              "США" <utf8_string>
            "zh-CN":
              "美国" <utf8_string>
          }
      }
    "registered_country":
      {
        "geoname_id":
          6252001 <uint32>
        "iso_code":
          "US" <utf8_string>
        "names":
          {
            "de":
              "USA" <utf8_string>
            "en":
              "United States" <utf8_string>
            "es":
              "Estados Unidos" <utf8_string>
            "fr":
              "États Unis" <utf8_string>
            "ja":
              "アメリカ" <utf8_string>
            "pt-BR":
              "EUA" <utf8_string>
            "ru":
              "США" <utf8_string>
            "zh-CN":
              "美国" <utf8_string>
          }
      }
  }
2. Compile Nginx and GeoIP2 module
The GeoIP2 module (ngx_http_geoip2_module) is not available in the typical Nginx packages coming from Ubuntu or Ondrej repositories.
To add this module, you’ll need to compile Nginx with ngx_http_geoip2_module added in as a dynamic module.
In this section, I’ll show you the steps I used to compile Nginx and the GeoIP2 module.
I’ll also list out the errors I bumped into and how I solved them.
2a. Download Source Code for Nginx & ngx_http_geoip2_module
First, create a work directory for the source code. For me, I created a directory under my user’s home directory.
$ cd ~
$ mkdir nginx-compile
$ cd nginx-compile
Next, I cloned the GeoIP2 module (ngx_http_geoip2_module) source code from its Github repo.
$ git clone https://github.com/leev/ngx_http_geoip2_module.gitYou can also download the source code as a zip file. It doesn’t matter.
After that, it’s time to download the source code for Nginx.
Start by finding out your Nginx version.
$ nginx -v
nginx version: nginx/1.18.0 (Ubuntu)
My Nginx version is 1.18.0, so I downloaded its source code using the command below:-
$ wget http://nginx.org/download/nginx-1.18.0.tar.gz
$ tar zxvf nginx-1.18.0.tar.gz
If your Nginx version is different, just replace 1.18.0 with your version number.
The tar command decompresses the tar.gz file.
At this point your work directory should look like this:-
~/nginx-compile$ ls
nginx-1.18.0  nginx-1.18.0.tar.gz  ngx_http_geoip2_module
2b. Compile Nginx with ngx_http_geoip2_module as dynamic module
Heads up: This step takes a lot of trial and error. Your errors may be different from mine. But their solutions are usually a few Google searches away.
Start by cd into the Nginx source code directory.
$ cd nginx-1.18.0Before we do anything, find out the configuration for your current Nginx build.
$ nginx -V

nginx version: nginx/1.18.0 (Ubuntu)
built with OpenSSL 1.1.1f 31 Mar 2020
TLS SNI support enabled
configure arguments: --with-cc-opt='-g -O2 -fdebug-prefix-map=/build/nginx-KTLRnK/nginx-1.18.0=. -fstack-protector-strong -Wformat -Werror=format-security -fPIC -Wdate-time -D_FORTIFY_SOURCE=2' --with-ld-opt='-Wl,-Bsymbolic-functions -Wl,-z,relro -Wl,-z,now -fPIC' --prefix=/usr/share/nginx --conf-path=/etc/nginx/nginx.conf --http-log-path=/var/log/nginx/access.log --error-log-path=/var/log/nginx/error.log --lock-path=/var/lock/nginx.lock --pid-path=/run/nginx.pid --modules-path=/usr/lib/nginx/modules --http-client-body-temp-path=/var/lib/nginx/body --http-fastcgi-temp-path=/var/lib/nginx/fastcgi --http-proxy-temp-path=/var/lib/nginx/proxy --http-scgi-temp-path=/var/lib/nginx/scgi --http-uwsgi-temp-path=/var/lib/nginx/uwsgi --with-debug --with-compat --with-pcre-jit --with-http_ssl_module --with-http_stub_status_module --with-http_realip_module --with-http_auth_request_module --with-http_v2_module --with-http_dav_module --with-http_slice_module --with-threads --with-http_addition_module --with-http_gunzip_module --with-http_gzip_static_module --with-http_image_filter_module=dynamic --with-http_sub_module --with-http_xslt_module=dynamic --with-stream=dynamic --with-stream_ssl_module --with-mail=dynamic --with-mail_ssl_module
See the configure arguments field? Copy that and insert it into the following command.
$ ./configure INSERT_CONFIGURE_ARGUMENTS_HERE --add-dynamic-module=../ngx_http_geoip2_moduleExample
This is what the command looks like for me.
$ ./configure --with-cc-opt='-g -O2 -fdebug-prefix-map=/build/nginx-KTLRnK/nginx-1.18.0=. -fstack-protector-strong -Wformat -Werror=format-security -fPIC -Wdate-time -D_FORTIFY_SOURCE=2' --with-ld-opt='-Wl,-Bsymbolic-functions -Wl,-z,relro -Wl,-z,now -fPIC' --prefix=/usr/share/nginx --conf-path=/etc/nginx/nginx.conf --http-log-path=/var/log/nginx/access.log --error-log-path=/var/log/nginx/error.log --lock-path=/var/lock/nginx.lock --pid-path=/run/nginx.pid --modules-path=/usr/lib/nginx/modules --http-client-body-temp-path=/var/lib/nginx/body --http-fastcgi-temp-path=/var/lib/nginx/fastcgi --http-proxy-temp-path=/var/lib/nginx/proxy --http-scgi-temp-path=/var/lib/nginx/scgi --http-uwsgi-temp-path=/var/lib/nginx/uwsgi --with-debug --with-compat --with-pcre-jit --with-http_ssl_module --with-http_stub_status_module --with-http_realip_module --with-http_auth_request_module --with-http_v2_module --with-http_dav_module --with-http_slice_module --with-threads --with-http_addition_module --with-http_gunzip_module --with-http_gzip_static_module --with-http_image_filter_module=dynamic --with-http_sub_module --with-http_xslt_module=dynamic --with-stream=dynamic --with-stream_ssl_module --with-mail=dynamic --with-mail_ssl_module --add-dynamic-module=../ngx_http_geoip2_moduleThe last chunk of the command –add-dynamic-module=../ngx_http_geoip2_module tells the compiler to compile ngx_http_geoip2_module as a dynamic module. And that the module is found in a directory called ngx_http_geoip2_module found one level up from where we currently are.
Once again, you’ll likely run into errors here. You’ll find some help on the errors in the next section Nginx Configure Error.
After running configure successfully, compile the source code by running
$ makeIf make isn’t available, just install it by running
$ sudo apt install makeIf the compilation is successful, a dynamic library ngx_http_geoip2_module.so should now be available in the objs directory.
And when you’re ready, install the output:-
$ make installThis step will copy the output files including the GeoIP module to where they belong in the system.
In my case, the module is copied to /usr/share/nginx/modules/
Nginx Configure Errors
These are some libraries I had to install to get rid of errors raised by the configure command.
$ sudo apt install gcc libssl-dev libpcre3 libpcre3-dev zlib1g-dev libxslt-dev libgd-dev libssl-dev makeBelow are the details on the errors I bumped into. I have included the error messages as well as the solutions. These are here for reference only.
If you don’t find the solution for your particular error, just Google it. That’s how I found these solutions anyway.
Error 1:
./configure: error: C compiler cc is not foundSolution:
$ sudo apt install gccError 2:
./configure: error: the HTTP rewrite module requires the PCRE library.Solution:
$ sudo apt install libpcre3 libpcre3-devError 3:
./configure: error: the HTTP gzip module requires the zlib library.Solution:
$ sudo apt install zlib1g-devError 4:
./configure: error: the HTTP XSLT module requires the libxml2/libxsltSolution:
$ sudo apt-get install libxslt-devError 5:
./configure: error: the HTTP image filter module requires the GD library.Solution:
$ sudo apt-get install libgd-devError 6:
./configure: error: SSL modules require the OpenSSL library.Solution 1:
$ sudo apt install libssl-devSolution 2:
On a different setup, I ran into some error when trying to apt install the SSL library:-
The following packages have unmet dependencies:
libssl-dev : Depends: libssl1.1 (= 1.1.1f-1ubuntu2.10) but 1.1.1j-1+ubuntu20.04.1+deb.sury.org+3 is to be installed
E: Unable to correct problems, you have held broken packages.
This is the command and resolution I went for. The first and second resolutions mess around with some Apache2 stuff and I don’t really feel comfortable with that.
The third resolution seems like the safer approach and it works for me.
$ sudo aptitude install libssl1.1 libssl-dev
The following actions will resolve these dependencies:

Keep the following packages at their current version:
1) libssl-dev [Not Installed]

Accept this solution? [Y/n/q/?] n
The following actions will resolve these dependencies:

Remove the following packages:
1) apache2-utils:i386 [2.4.51-1+ubuntu20.04.1+deb.sury.org+1 (focal, now)]
2) libaprutil1:i386 [1.6.1-5+ubuntu20.04.1+deb.sury.org+5 (focal, now)]
3) libssl1.1:i386 [1.1.1j-1+ubuntu20.04.1+deb.sury.org+3 (now)]

Install the following packages:
4) apache2-utils [2.4.52-2+ubuntu20.04.1+deb.sury.org+1 (focal)]

Upgrade the following packages:
5) apache2 [2.4.51-1+ubuntu20.04.1+deb.sury.org+1 (now) -> 2.4.52-2+ubuntu20
6) apache2-bin [2.4.51-1+ubuntu20.04.1+deb.sury.org+1 (now) -> 2.4.52-2+ubun
7) apache2-data [2.4.51-1+ubuntu20.04.1+deb.sury.org+1 (focal, now) -> 2.4.5

Downgrade the following packages:
8) libssl1.1 [1.1.1j-1+ubuntu20.04.1+deb.sury.org+3 (now) -> 1.1.1f-1ubuntu2

Accept this solution? [Y/n/q/?] n
The following actions will resolve these dependencies:

Downgrade the following packages:
1) libssl1.1 [1.1.1j-1+ubuntu20.04.1+deb.sury.org+3 (now) -> 1.1.1f-1ubuntu2
2) libssl1.1:i386 [1.1.1j-1+ubuntu20.04.1+deb.sury.org+3 (now) -> 1.1.1f-1ub

Accept this solution? [Y/n/q/?] y
2c. Enabling ngx_http_geoip2
Create a new conf file in /usr/share/nginx/modules-available
$ cd /usr/share/nginx/modules-available
$ touch mod-http-geoip2.conf
Add the following line to conf file.
load_module modules/ngx_http_geoip2_module.so;Enable the module by creating a symbolic link in /etc/nginx/modules-enabled/
$ sudo ln -s /usr/share/nginx/modules-available/mod-http-geoip2.conf /etc/nginx/modules-enabled/Quick sanity test
$ sudo nginx -t
nginx: the configuration file /etc/nginx/nginx.conf syntax is ok
nginx: configuration file /etc/nginx/nginx.conf test is successful
So far so good. But how to tell if it’s really working? Only one way to find out…
3. Application: Limit Access by Country in Nginx GeoIP2
For this application example, we’ll be allowing access to a particular file (wp-login.php) from the US only while blocking out other countries.
These are the steps.
In the http scope, add the following directives that resolves the ISO country code from the user’s IP address.
geoip2 /usr/share/GeoIP/GeoLite2-Country.mmdb {
    $geoip2_data_country_iso_code country iso_code;
}
The variable name $geoip2_data_country_iso_code can be random. It doesn’t matter.
Next, add a map directive that defines the access for the countries:-
map $geoip2_data_country_iso_code $allowed_country {
  default no;
  US yes;
}
In this example above, no countries are allowed by default (“no”). And the US is whitelisted (“yes”).
Next, we’ll use $allowed_country in conjunction with the if directive where we want to limit access.
For example,
location ~ /wp-login.php {
    if ($allowed_country = no) {
        return 503;
    }
    ---- snipped ----
}
Finally, test and reload the configuration.
$ sudo nginx -t
$ sudo systemctl reload nginx
Tips
1. Use mmdblookup command to Geolocate a particular IP manually.
$ sudo mmdblookup --file /usr/share/GeoIP/GeoLite2-Country.mmdb --ip 8.8.8.82. Add country code as header to provide visibility during debugging.
add_header Country-Code $geoip2_data_country_iso_code;3. In this setup, GeoIP2 doesn’t work if you have CloudFlare enabled. That’s because the Nginx is getting CloudFlare IPs instead of actual client IPs. I think that can be fixed using the remoteip module but I haven’t looked deep enough into it.
Nginx GeoIP2 Applications
- Choose Nearest Server – Nginx documentation
References
- https://github.com/maxmind/libmaxminddb – C library for the MaxMind DB file format
- https://github.com/leev/ngx_http_geoip2_module/ – ngx_http_geoip2_module repository