
Find out how to use Nginx to disable direct IP access to your websites.
In particular, I’ll cover these three solutions that will turn away users, malicious or not, when they try to access your server via IP:-
- ssl_reject_handshake approach for Nginx 1.19.4 and newer (recommended solution)
- Self-signed SSL certificate approach for Nginx older than version 1.19.4
- Using if directive in server block
These solutions work for both HTTP and HTTPS.
Use Nginx to Block Direct IP Access
You likely won’t face this problem if you’re using shared hosting.
But if you’re running your own Nginx web server on a VPS or dedicated server, your website might be accessible directly through the IP address.
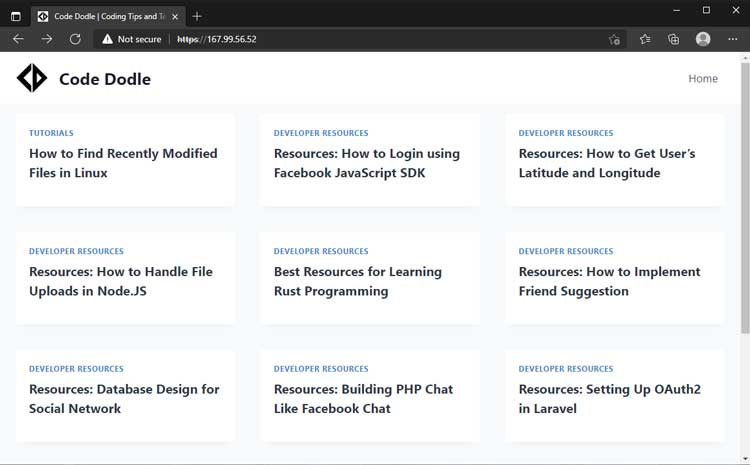
That’s what was happening to this website. Pay attention to the address bar:-
I had the HTTP direct IP access disabled. But HTTPS was a different story.
Even though my server block for Code Dodle doesn’t specify the IP address, Nginx automatically falls back to it because it’s the only server that listens to port 443 (HTTPS).
I tried to just add listen 443 to my default server block, but Nginx responded with this error:-
nginx: [emerg] no "ssl_certificate" is defined for the "listen ... ssl" directive in /etc/nginx/sites-enabled/no-bare:1In other words, I needed to do more research. And research WAS done and below are the ways to block off direct IP access, both HTTP and HTTPS.
But let’s start with just HTTP.
Disable Direct HTTP IP Access
Create a new site config file in /etc/nginx/sites-available (or wherever that is). This will be the default handler for all the server_name‘s that aren’t explicitly defined, and that includes the IP address.
server {
  listen 80 default_server;
  listen [::]:80 default_server;
  server_name _;

  return 444;
}
In the example above, we’re listening to port 80 on both IPv4 and IPv6. And they’re set to be the default server.
server_name _ is a catch-all for server_name‘s not found elsewhere.
The 444 response code is an Nginx-specific pseudo response code, it instructs Nginx to just close the connection and not provide any response. If you prefer, you can use return 404 instead to let the users know that there are nothing to be found here.
When you enable this configuration, http://<IP> should no longer be accessible.
Quick tip
Enable a server config file by creating a symbolic link in /etc/nginx/sites-enabled. E.g.
sudo ln -s /etc/nginx/sites-available/default /etc/nginx/sites-enabled/Disable Direct HTTPS IP Access (Nginx 1.19.4 and newer)
If you’re using Nginx 1.19.4 or newer, the newly added ssl_reject_handshake directive makes it really easy to block direct IP access through HTTPS.
Quick tip: you can check Nginx version using nginx -v from the command line.
server {
  listen 80 default_server;
  listen [::]:80 default_server;

  listen 443 default_server;
  listen [::]:443 default_server;
  ssl_reject_handshake on;

  server_name _;
  return 444;
}
We’re re-using the server block from the previous section. But we are adding three new lines.
The two listen directives listen to port 443 (HTTPS) on IPv4 and IPv6 and they’re designated as the default handler for these cases.
When enabled, ssl_reject_handshake rejects SSL handshakes in the server block. With this option turned on, Nginx will no longer complain about not finding an SSL certificate.
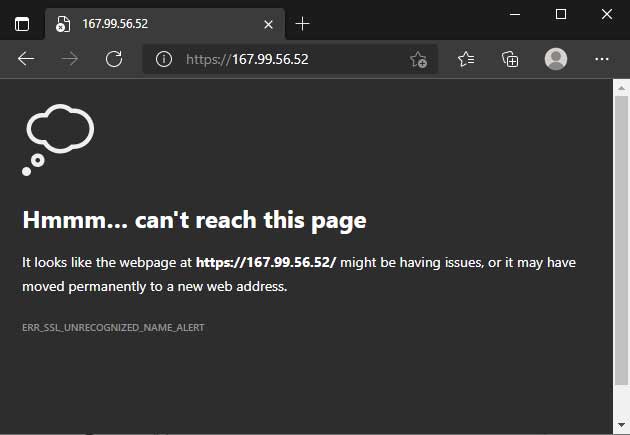
Depending on your browser, the message you get might be different. But the outcome should be consistent: https://<ip> is no longer accessible.
This is the solution that I use.
Disable Direct HTTPS IP Access (Before Nginx 1.19.4)
If you’re running an older Nginx (i.e. older than ver. 1.19.4), I really suggest that you upgrade it and use the solution above.
But if that is not possible, you’ll have to generate a self-signed SSL certificate to work around this Nginx error:-
nginx: [emerg] no "ssl_certificate" is defined for the "listen ... ssl" directiveFirst, let’s take a look at the server block setup. Then I’ll show you how to generate a cert using openssl.
server {
  listen 80 default_server;
  listen [::]:80 default_server;

  listen 443 default_server;
  listen [::]:443 default_server;

  ssl_certificate /etc/nginx/ssl/default.crt;
  ssl_certificate_key /etc/nginx/ssl/default.key;

  server_name _;
  return 444;
}
Again, the two newly added listen directives listen to port 443 (HTTPS) on IPv4 and IPv6.
Then we have ssl_certificate and ssl_certificate_key which point to the self-signed SSL certificate and private key respectively.
Generate SSL Certificate
To generate these two items, use the openssl command.
sudo openssl req -x509 -nodes -days 3650 -newkey rsa:2048 -keyout default.key -out default.crt -subj '/CN='The openssl command above generates a SSL cert that is valid for 10 years.
The -subj '/CN=' option specifies that the canonical name is empty. It is used to bypass the setup wizard. If you prefer to go through the wizard to fill up the details, just remove this option.
I put both the key and cert in /etc/nginx/ssl but you can put it anywhere you prefer.
And when all is done and Nginx is reloaded, you should be getting a response similar to this:-
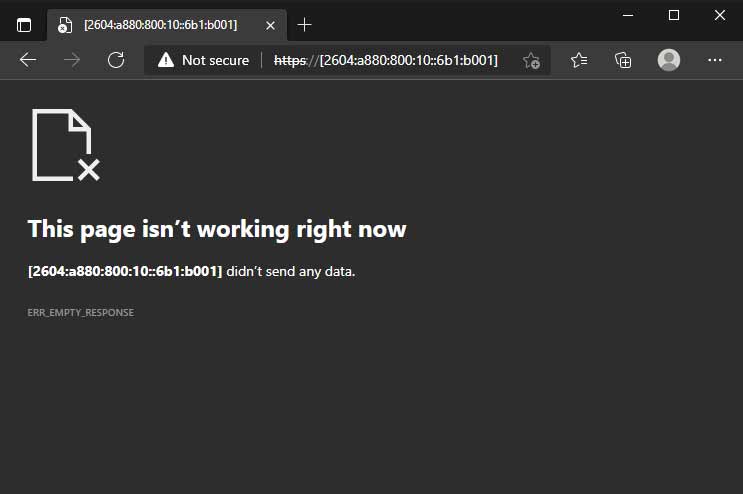
Above: Direct access via HTTPS IPv6 has been blocked successfully
Disable Direct IP Access Using IF
Not the most elegant solution, but this is probably the easiest solution to implement when you’re only hosting a single website on your server.
Note that I don’t recommend this approach. See my reasons at the bottom.
Anyway, for this solution we’ll add an if block in the existing server block for your website.
server {
  listen 443 default_server;
  listen [::]:443 default_server;

  if ($host != www.codedodle.com) {
    return 444;
  }

  server_name www.codedodle.com;
  <the remainder of the server block>
}
The preceding example shows the server block for www.codedodle.com.
An if-block has been added to check for the host name. The server will terminate the connection without response (444) whenever the host is not www.codedodle.com
Notice that it will block everything else such as codedodle.com or static.codedodle.com. If you want to support more subdomains, you can use regular expression to do that.
For example, this works for both www. and non-www version of the website.
if ($host !~* ^(www\.)?codedodle.com$) {
     return 444;
}
The if directive is considered evil when used in a location block, but using it in a server block (such as our case) shouldn’t be that bad.
Personally I don’t recommend this approach for a few reasons:-
- Not scalable – a lot of work involved if you’re managing multiple domains or even just subdomains
- Error-prone – one typo in the regex might bring down your redirection / subdomains
- The ssl_reject_handshake solution is much better
References
I’d be lying if I said I came up with these solutions all by myself. Of course I googled.
Here are some of the resources I used in writing this article.
- Nginx official ngx_http_ssl_module documentation – documentation on ssl_reject_handshake. See it here.
- Server Fault – Best way to prevent default server? – the Q&A thread where I first saw ssl_reject_handshake. It was mentioned by a user named anx in a comment for the marked answer. See it here.
- Nginx ticket that leads to the introduction of ssl_reject_handshake. See it here.
- Then openssl command I used above was adapted from a Stack Overflow thread but unfortunately I lost the link to the thread.