
In this tutorial, I will show you how to set up SSH Git authentication for Bitbucket.
In 2021, Bitbucket is moving away from password authentication. What that means is you can no longer use your Bitbucket account password to authenticate your identity when you try to git clone or perform any other git operations.
With authentication by password removed, there are two other authentication methods you can use. One is app token which I will discuss at a different time. The other being SSH authentication which we’ll cover in this article.
How to Set Up Bitbucket SSH Authentication for Git
SSH authentication can be set up in two ways on a free Bitbucket account. It can be set up to provide account-level access or it can also be configured to provide access by repository. The latter is useful when you’re providing SSH access to a collaborator who only requires access to one repository.
For Bitbucket Data Center and Server, it seems like you can also set it up on the project level according to this page. But unfortunately I’m using a free Bitbucket Cloud account that doesn’t support this feature. I encourage you to follow the link to find out more if you’re interested in giving users project-level access privilege.
Quick links
- Generate SSH Keys
- Account-Level SSH Access
- Per-Repository SSH Access
- Testing
- Troubleshooting
- More Tips on Bitbucket SSH
Generate SSH Keys
If you already have your SSH key pair generated previously, you can reuse them for Bitbucket.
However, if you don’t, here are the steps to create a new pair of SSH keys (a private key and a public key).
$ ssh-keygenRunning this command will bring up a step-by-step wizard that will help you generate your keys. At the time of writing, ssh-keygen uses 2048-bit RSA encryption by default. While that should be good enough for most cases, this isn’t the most secure encryption.
If you want to feel safer, you can use ED25519 or the 4096-bit version of RSA instead:
ED25519 – this is the encryption I’m using for this tutorial. And here’s the command:-
$ ssh-keygen -t ed25519Alternatively, if ED25519 isn’t supported on your system. Try the 4096-bit RSA instead by using this command.
$ ssh-keygen -t rsa -b 4096Once you hit enter, the first step is to tell the wizard where to store the keys and what to name them. Since we’re fine with using the default, just hit enter.

Next you’ll be asked for an optional passphrase.
![]()
The passphrase is like a password for your private key. It is used to encrypt your private key. This helps prevent malicious users from using your private key even if they manage to steal the key from you.
In other words, it’s optional but not really.
Just set a secure passphrase that you can remember easily. You’ll be prompted for it every time you interact with the Bitbucket server via SSH later on.
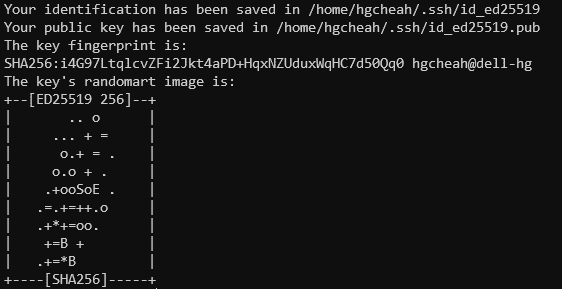
Hit enter again and your keys will be generated. For the purpose of this tutorial, just focus on the first two lines in the screenshot above (also shown below).
Your identification has been saved in /home/hgcheah/.ssh/id_ed25519
Your public key has been saved in /home/hgcheah/.ssh/id_ed25519.pub
id_ed25519 is the private key that we want to keep locally.
The public key id_ed25519.pub will be uploaded to Bitbucket.
Now that we have the SSH keys ready, let’s put them to use.
Import SSH Key to Bitbucket
As mentioned earlier, there are two levels of SSH access you can set up on a free Bitbucket account.
One is the account-level SSH access which gives the user access to basically everything. The other is a more restrictive access that limits to access per repository.
Here’s how to set them up, respectively.
Bitbucket Account-Level SSH Authentication
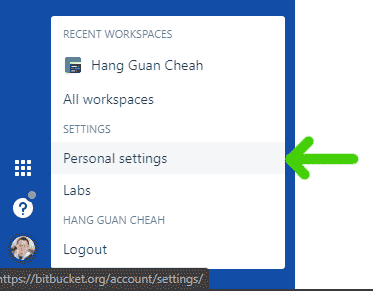
First, click on your avatar in the lower left corner. In the menu that pops up, click Personal settings.
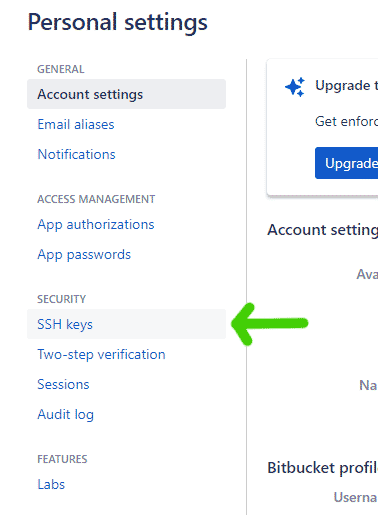
Next, under SECURITY, click SSH keys.
In the next screen, click Add key and the following dialog will pop up.
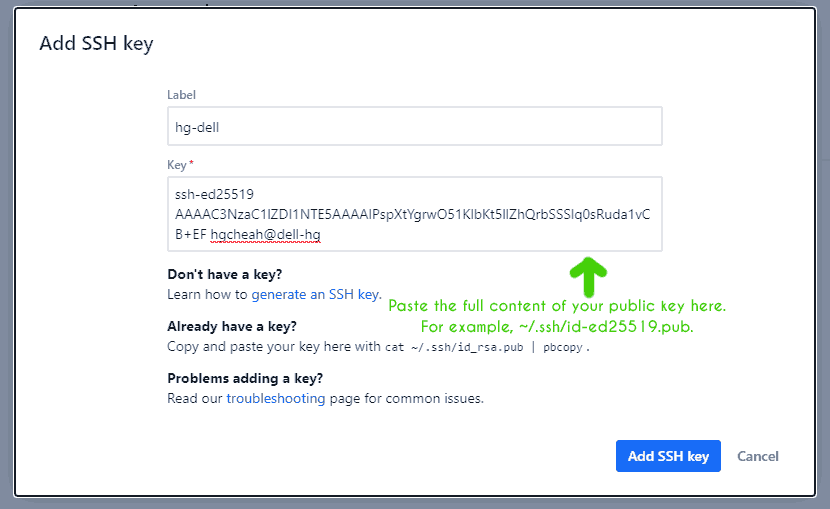
For Label, give the key a name that represents the entity that your key represents. For example, my private key is only used on my old and trustworthy Dell laptop. So I’m naming it hg-dell. However this is trivial and doesn’t really matter.
For Key, copy and paste the content of the public key that you have generated earlier.
Finally, click Add SSH key and you’re done!
To verify that your SSH key is working, see the Testing section below.
Bitbucket Per Repository SSH Authentication
Granting repository-level SSH access follows a similar flow.
First, click on the repository that you want to grant user access to.
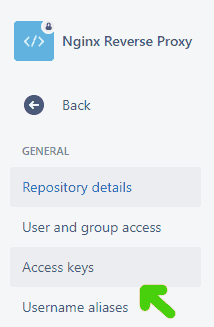
Next, on the left menu, click Access keys.
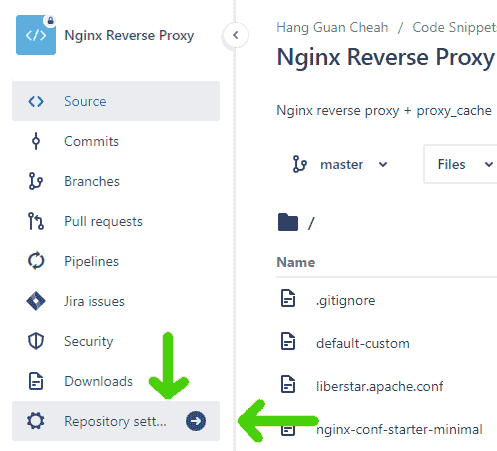
Then choose Repository setting, which is found near the bottom of the repo-level menu.
On the next page, click the Add keys button to bring up the following dialog.
For label, give it a name that represents the key. For example, I’m using hg-dell to represent my Dell computer.
For Key, copy and paste the full content of your PUBLIC key.
After that, just click Add SSH key and you’re done.
To verify that your SSH key is working, see the Testing section below.
Testing
To check if the SSH access has been set up properly, use this ssh command:-
$ ssh -T git@bitbucket.orgIf you’ve added a passphrase during key generation, the command will prompt you for it now.
Below is a sample output that shows the SSH keys were set up correctly.
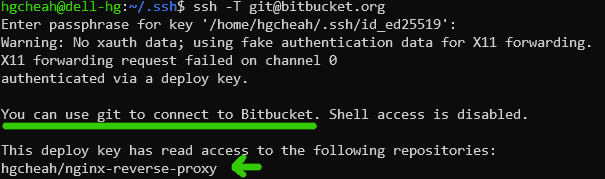
For this example, I have given the key holder access to one single repository which is hgcheah/nginx-reverse-proxy and the response above has verified my setup.
(You can ignore the X11 warning in the screenshot above, I didn’t set up X11 forwarding properly on my WSL2 Ubuntu.)
Troubleshooting
In setting up Bitbucket SSH authentication, you may run into some errors. For example, some common errors are Host key verification failed or git@bitbucket.org: Permission denied (publickey).
To troubleshoot these problems, or any SSH-related errors, use ssh‘s -v flag to enable verbose mode.
For example, this command will attempt to test the SSH connection and display debug logs (enabled by -v).
$ ssh -Tv git@bitbucket.org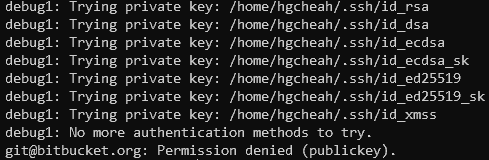
The screenshot above shows that we’re getting a Permission denied error.
Looking at the debug messages reveals that SSH has only looked at private keys that start with id_* in ~/.ssh. And this is an excepted behavior of SSH.
These messages could indicate that either your key is not located in ~/.ssh or that it has a unique name that SSH doesn’t automatically detect.
For the former, simply move your private key to ~/.ssh. For the latter, you’ll want to either rename your key or define a custom host in your ~/.ssh/config file. Check out the Using Unique SSH Keys for Bitbucket section below.
More Tips on Bitbucket SSH
Below are some additional tips and tricks related to Git, Bitbucket, and SSH access.
I couldn’t really fit these sub-topics into the main flow of the article. So I’m keeping them here, hopefully some of you will find them useful.
Using Unique SSH Keys for Bitbucket
While it’s perfectly fine to reuse SSH key pairs, especially when they represent the same entity, be it the same machine or the same person, the reality is it’s more secure to have separate key pairs.
If you decide to generate a unique set of keys for Bitbucket use, here’s how to do it.
First, cd into ~/.ssh then run keygen. Give the key pair a unique during key generation.
For example,
$ cd ~/.ssh
$ ssh-keygen -t ed25519
Generating public/private ed25519 key pair.
Enter file in which to save the key (/home/hgcheah/.ssh/id_ed25519): bitbucket-acc-1
In the example above, two files will be generated. Private key: bitbucket-acc-1 and public key: bitbucket-acc-1.pub.
Now if you just leave this as is, SSH will NOT pick up these keys when connecting to Bitbucket. And you will end up with a Host key verification failed error.
What you need to do is add the following host in ~/.ssh/config. Just create a new config file if it doesn’t already exist.
Host bitbucket.org
    IdentityFile ~/.ssh/bitbucket-acc-1
    IdentitiesOnly yes
This snippet above tells SSH to use IdentityFile ~/.ssh/bitbucket-acc-1 when working with bitbucket.org.
After that, just add your public key to Bitbucket by following some of the steps in the earlier sections.
Switch Origin from HTTP to SSH
After you’ve been granted SSH access to your Bitbucket repositories, it’s time to update the origins of your local repos from HTTP to SSH.
To change the URL of the origin, use git remote set-url. Here’s the format for Bitbucket,
$ git remote set-url origin git@bitbucket.org:<USERNAME>/<REPOSITORY>-gitFor example, supposed this is how the origin URLs look like before any changes are made,
$ git remote -v
origin  https://demouser@bitbucket.org/demouser/demo-repo.git (fetch)
origin  https://demouser@bitbucket.org/demouser/demo-repo.git (push)
As you can see, they’re in HTTPS. You can also tell that the username is demouser and the origin repository name is demo-repo.
Let’s switch over to SSH by running this command,
$ git remote set-url origin git@bitbucket.org:demouser/demo-repo.gitCheck the URLs again,
$ git remote -v
origin  git@bitbucket.org:demouser/demo-repo-git (fetch)
origin  git@bitbucket.org:demouser/demo-repo-git (push)
And voila! The URLs have been updated to use SSH.